The injection molding process stands as a cornerstone of modern manufacturing, adept at producing an extensive array of plastic components with remarkable precision and efficiency. This intricate process unfolds through several meticulously orchestrated stages, each vital to transforming raw materials into finished products. Below, we explore the injection molding procedure in a detailed, nuanced manner that highlights both its complexity and its transformative capabilities.
Stage 1: Material Preparation
The journey commences with the careful selection and preparation of raw materials, predominantly in the form of plastic pellets or granules. The choice of plastic is paramount, dictated by the requisite mechanical properties, thermal stability, and aesthetic characteristics demanded by the final product. Once selected, these materials are introduced into the hopper of the injection molding machine, poised for the next phase of transformation.
Stage 2: Melting
The prepared plastic is subsequently fed from the hopper into the heated barrel of the injection molding apparatus. Herein lies the heart of the melting process: a reciprocating screw swiftly rotates and moves the material forward, exerting a dual action of heat application and pressure to effectuate the transition of plastic from solid to molten form. This phase requires precise temperature control to ensure the polymer reaches its melting point without degradation, setting the stage for successful injection.
Stage 3: Injection
Once the plastic has reached an optimal molten state, the screw retracts, leading into the injection phase. The molten polymer is forcefully injected into the mold cavity via the nozzle and sprue, filling the intricate geometric contours of the mold. This injection must be executed with exacting pressure to eliminate air entrapment and ensure a thorough fill, which is essential for achieving the desired dimensional accuracy.
Stage 4: Cooling
Following the injection, the mold remains securely closed to facilitate a controlled cooling phase. During this critical stage, the molten plastic cools and solidifies, assuming the precise shape of the mold cavity. The duration of this cooling period is contingent upon variables such as part thickness and the thermal properties of the plastic, necessitating an adept understanding of material behavior under different cooling rates to avert warpage or defects.
Stage 5: Mold Opening
Upon the completion of the designated cooling time, the mold is systematically opened utilizing the injection molding machine's clamping unit. The separation of the moving platen from the stationary platen allows access to the molded component. Here, the ejector system becomes instrumental, employing ejector pins or plates to gently expel the newly formed part from the mold cavity without sustaining damage.
Stage 6: Part Ejection
As the solidified plastic part is ejected, meticulous care is taken to ensure it exits smoothly to prevent scratches or surface marks. This ejection process, while seemingly straightforward, requires precision and calibration to maintain both the integrity of the part and the functionality of the mold.
Stage 7: Mold Closing
Once the component has been successfully removed, the mold is efficiently closed once more, reinitiating the cycle. The machine is primed and ready to commence the next injection molding sequence, embodying the continuous nature of this manufacturing process.
Stage 8: Quality Control
Intrinsically woven throughout the injection molding cycle is a robust framework of quality control measures. Continuous monitoring of the mold's dimensional accuracy and surface quality is essential to ascertain that each produced part meets stringent industry standards. Various non-destructive testing methods, visual inspections, and precise measurement tools are employed to uphold rigorous quality assurance.
Stage 9: Recycling and Reusing
In recognition of sustainability imperatives, any excess or scrap material generated during the molding process is systematically collected for recycling. This practice not only mitigates waste but also optimizes material costs, fostering a more environmentally responsible manufacturing paradigm.
Stage 10: Repeat the Cycle
The injection molding process epitomizes efficiency through its repetitive nature, wherein each cycle integrates the essential stages of injection, cooling, mold opening, and ejection. The comprehensive cycle time, which dictates production throughput, is essential for calculating the operational effectiveness of the molding system.
Injection molding transcends mere manufacturing; it's a controlled chaos, a ballet of molten polymers guided by precise parameters and unforgiving tolerances. This process, while seemingly straightforward – heating thermoplastic pellets, injecting them into a mold, and cooling the resultant part – conceals a labyrinthine complexity demanding meticulous attention to detail at every stage. Failure at any point can cascade into catastrophic consequences, yielding scrap, delays, and financial hemorrhaging.
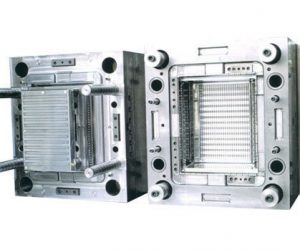
The Crucible of Creation: Mold Design and Material Selection
The genesis of any injection-molded part lies not in the machine, but in the mold itself. This intricate metal edifice, a testament to engineering prowess, isn't simply a cavity; it's a microcosm of the final product, a blueprint etched in steel or aluminum. Its design, a symphony of gates, runners, and cooling channels, dictates the flow dynamics of the molten polymer, influencing everything from part integrity to cycle time. Computer-aided design (CAD) software, while indispensable, merely provides the framework; the true artistry lies in anticipating and mitigating potential flaws – sink marks, weld lines, warpage – that can arise from subtle variations in geometry, material properties, or processing parameters. The choice of mold material itself, a critical decision often overlooked, significantly impacts durability, thermal conductivity, and ultimately, the mold's lifespan – a crucial factor in overall cost-effectiveness.
Material selection, far from a simple choice from a catalog, demands a nuanced understanding of polymer behavior under extreme conditions. The seemingly innocuous selection of polyethylene (PE), polypropylene (PP), or acrylonitrile butadiene styrene (ABS) actually involves a complex interplay of factors: desired mechanical properties (strength, stiffness, impact resistance), thermal stability, chemical resistance, and, critically, the cost-performance trade-off. The addition of fillers, reinforcing agents, and colorants further complicates the equation, requiring a deep understanding of material science and its implications for processing.
The Machine's Symphony: Parameter Optimization and Process Control
The injection molding machine itself is a complex electromechanical system, a finely tuned instrument capable of delivering precise amounts of molten polymer under controlled pressure and temperature. The seemingly simple parameters – barrel temperature, injection pressure, screw speed, holding time – are not independent variables; they interact in a non-linear fashion, creating a highly sensitive system prone to instability. Optimizing these parameters is not a straightforward process; it often involves iterative experimentation, statistical analysis, and a deep understanding of the underlying physics and chemistry. Slight deviations can lead to catastrophic failures: short shots, air entrapment, or the dreaded warpage that renders parts unusable.
Beyond the Machine: Quality Control and the Spectre of Defects
The process doesn't end with the ejection of the part from the mold. Rigorous quality control is paramount, demanding meticulous inspection for a myriad of potential defects: sink marks, flow lines, flash, short shots, and warping. These defects, often subtle yet devastating, can be traced back to subtle variations in any of the aforementioned parameters, highlighting the intricate interplay of factors that govern the success or failure of the injection molding process. Statistical process control (SPC) techniques are often employed to monitor process stability and identify potential problems before they escalate into widespread defects.
The Broader Context: Applications and the Future of Injection Molding
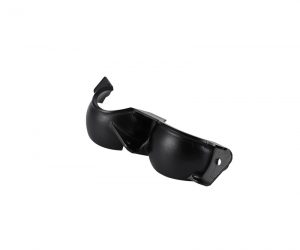
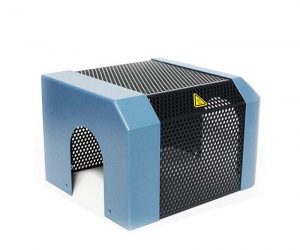
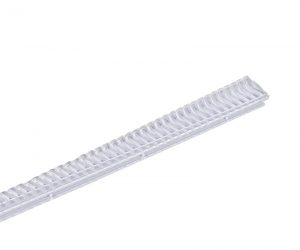
Injection molding's ubiquity is a testament to its versatility and efficiency. From the mundane – plastic bottle caps and disposable cutlery – to the sophisticated – medical implants and automotive components – its applications are seemingly limitless. However, the industry is not static. The drive towards sustainability, coupled with advancements in materials science and automation, is pushing the boundaries of injection molding, leading to the development of bio-based polymers, more efficient processes, and increasingly complex part geometries. The future of injection molding is not just about producing parts; it's about creating a more sustainable and efficient manufacturing ecosystem. The chaotic dance of molten polymers continues, but with ever-increasing precision and sophistication.